These run from a strap of wood and nails you stomp by hand to a welded steel roller you pull behind a mower.
What decides which one I would build is how much ground I am covering and whether I want to walk it or tow it.
A tow hitch set too high lifts the spikes clean off the grass; too low and they sink so deep the whole rig sticks. I measure mine before the concrete goes in.
[link-whisper-related-posts]1. Homemade Lawn Aerator
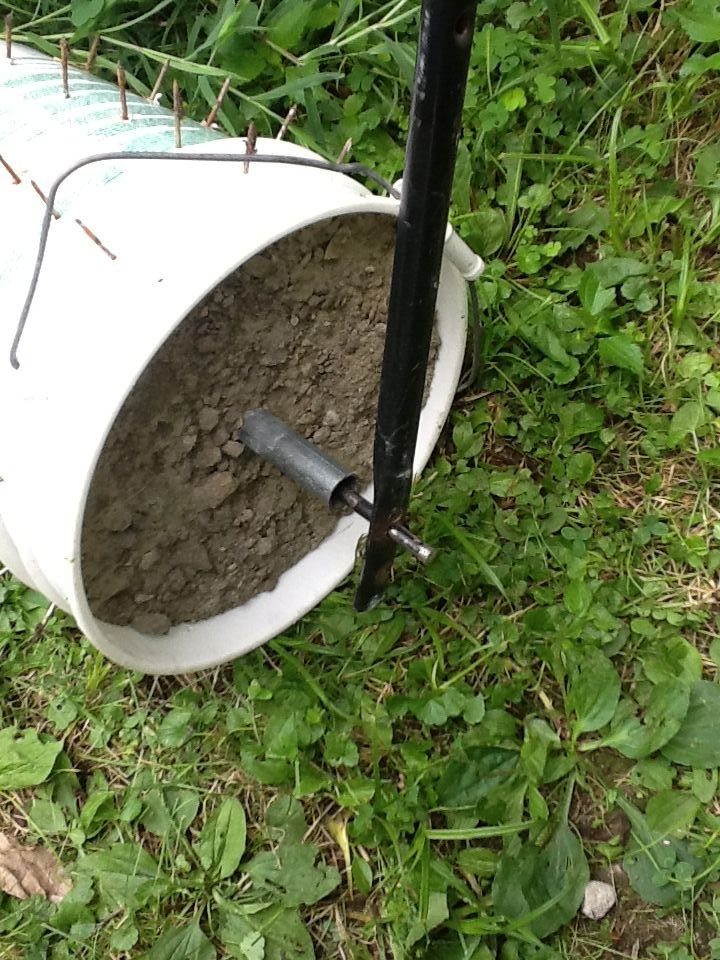
This is the bucket-and-concrete build most people picture when they think DIY aerator.
A plastic bucket forms the drum, nails punch through the sides as spikes, and an axle with a handle lets you roll it across the lawn like a push mower.
I like that the weight comes from concrete or soil packed inside, so you control how hard the nails bite. Too light and the spikes skim the thatch; too heavy and you compact what you meant to loosen.
I’d test it on a small patch first and check that the nails reach past the grass roots, which sit far enough down that short hardware won’t cut it.
The hardware-store parts keep costs low, but this version takes time to set and cure. If you need aeration this weekend, skip ahead to the garden fork.
2. Wooden Blocks Nails and a Strap
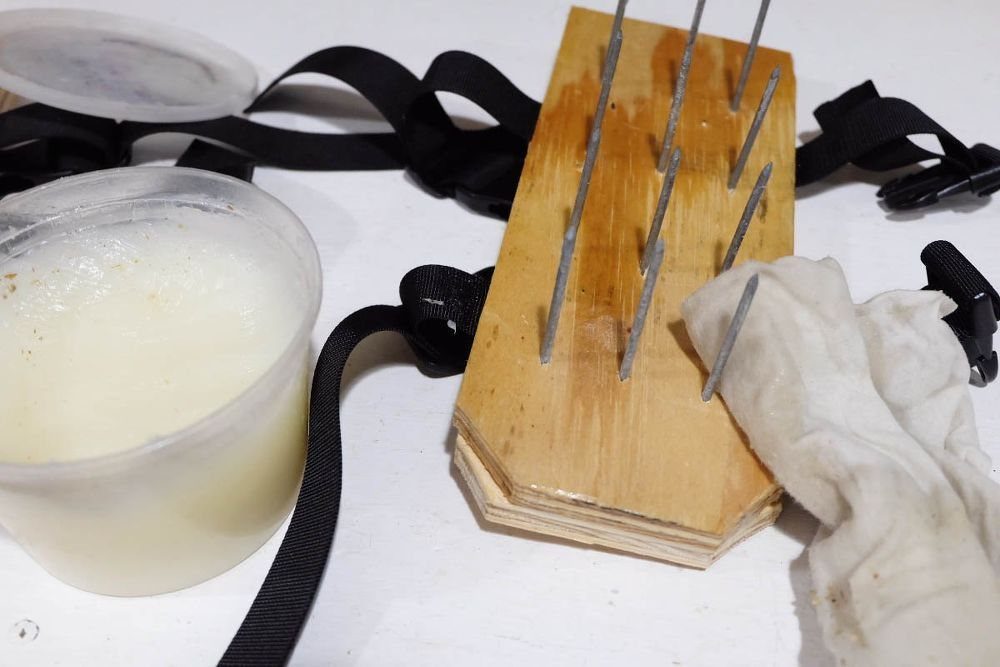
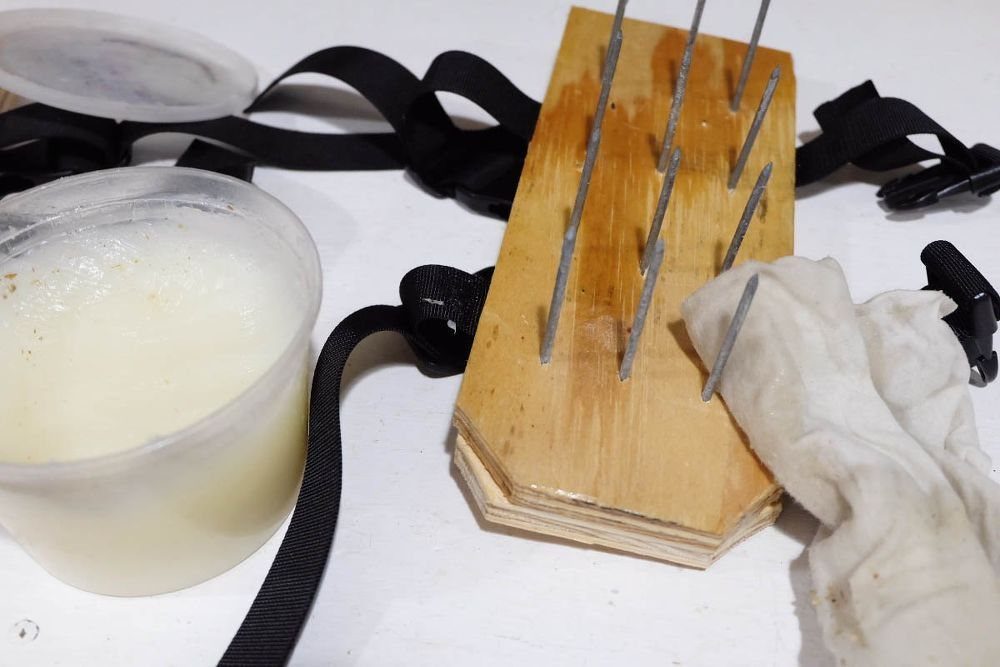
Strapped to your shoe, this turns every step across the lawn into an aeration pass. A wood block holds the nails, buckles keep it on your boot, and your body weight drives the spikes in.
What I’d check before starting: strap length against your actual footwear, and nail spacing. Too dense and you are punching holes faster than the soil can recover; too sparse and you are walking more than aerating.
I’d also sand and seal the block if the photo’s paste wax is any hint, since wet wood splits and loose nails end up in your grass.
This suits small lawns where a tow-behind or roller is more tool than job. The labor is all yours, so expect a workout and plan your afternoon around the size of your yard.
3. Drive Nails Into the Soil
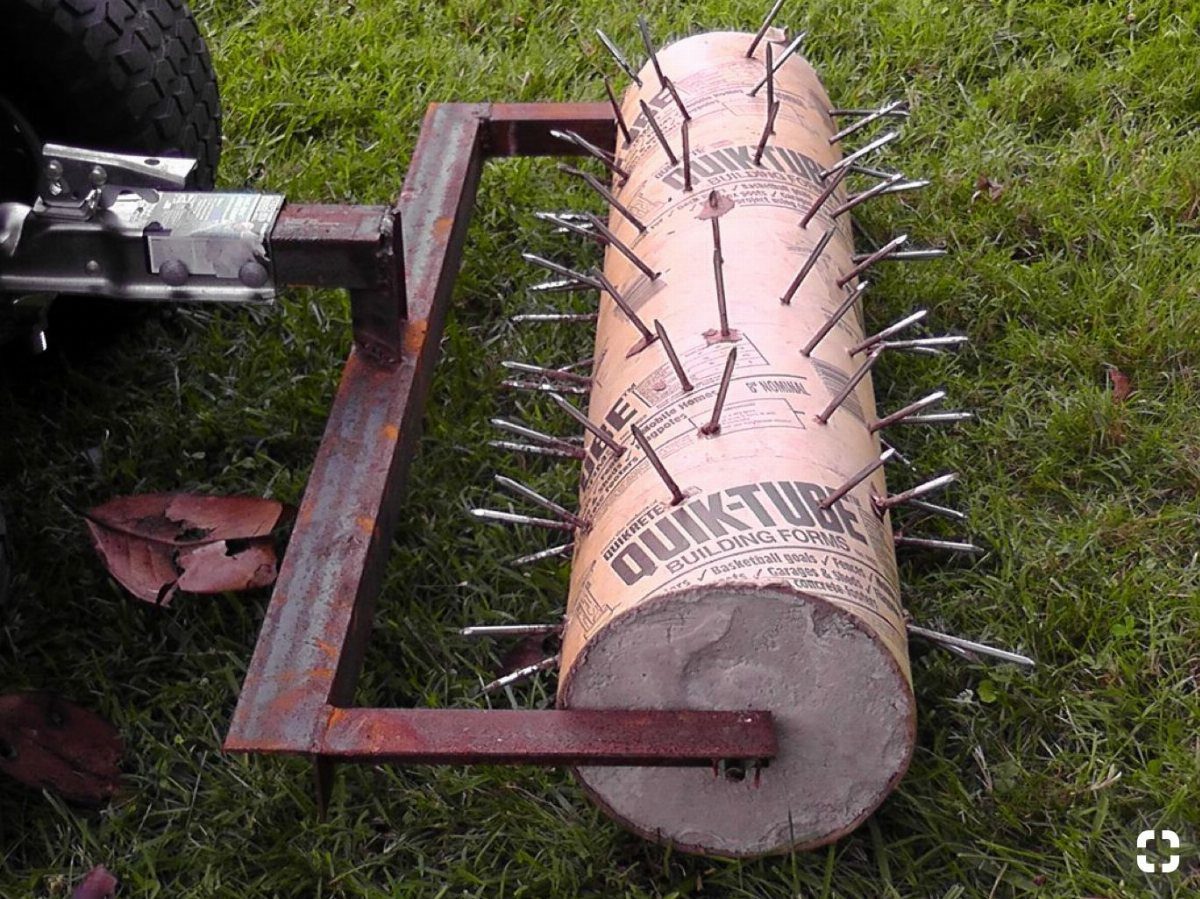
A concrete-filled cardboard tube on a towing frame, studded with nails and pulled behind a lawn tractor or ATV. The Quik-Tube form gives you a cylinder without lathe work; the nails shoulder the aeration; the frame keeps it tracking straight.
What matters here is towing speed and tube diameter. Too fast and the tube skips or the nails slice rather than punch; too narrow a tube and you need more passes to cover the same ground.
I’d verify the frame height matches my hitch before committing concrete, since a misaligned tow bar either lifts the nails clear or drags them so deep they do not come free.
Cardboard is not forever.
One season of wet grass and stored damp may soften the form. Store it dry or plan a rebuild next spring.
4. DIY Aerator Roller
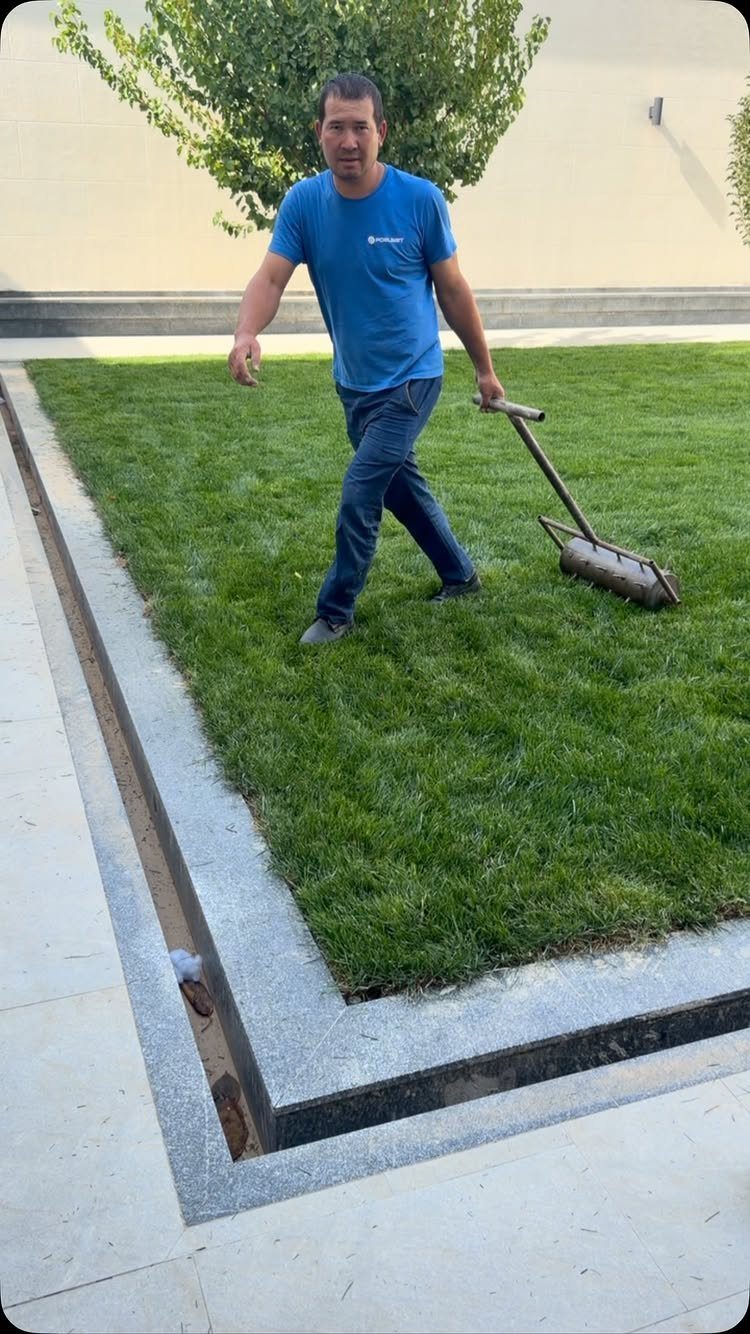
A metal cylinder with spikes welded or bolted around it, pulled by a long handle across the turf. The commercial style, built at home from pipe or barrel stock.
Metal construction lasts, and a handle long enough to walk upright saves your back against the strap-on block method.
What I’d verify: spike projection and drum diameter together set how deep you go. A smaller drum with 2-inch spikes behaves differently than a larger drum with the same spikes, the larger diameter rolling easier but cutting shallower.
Welding or drilling steel takes tools and skill I would not assume every reader owns.
If you can borrow a drill press and tap set, bolts work. If not, this build waits until you know someone who can help.
5. Garden Fork Aeration
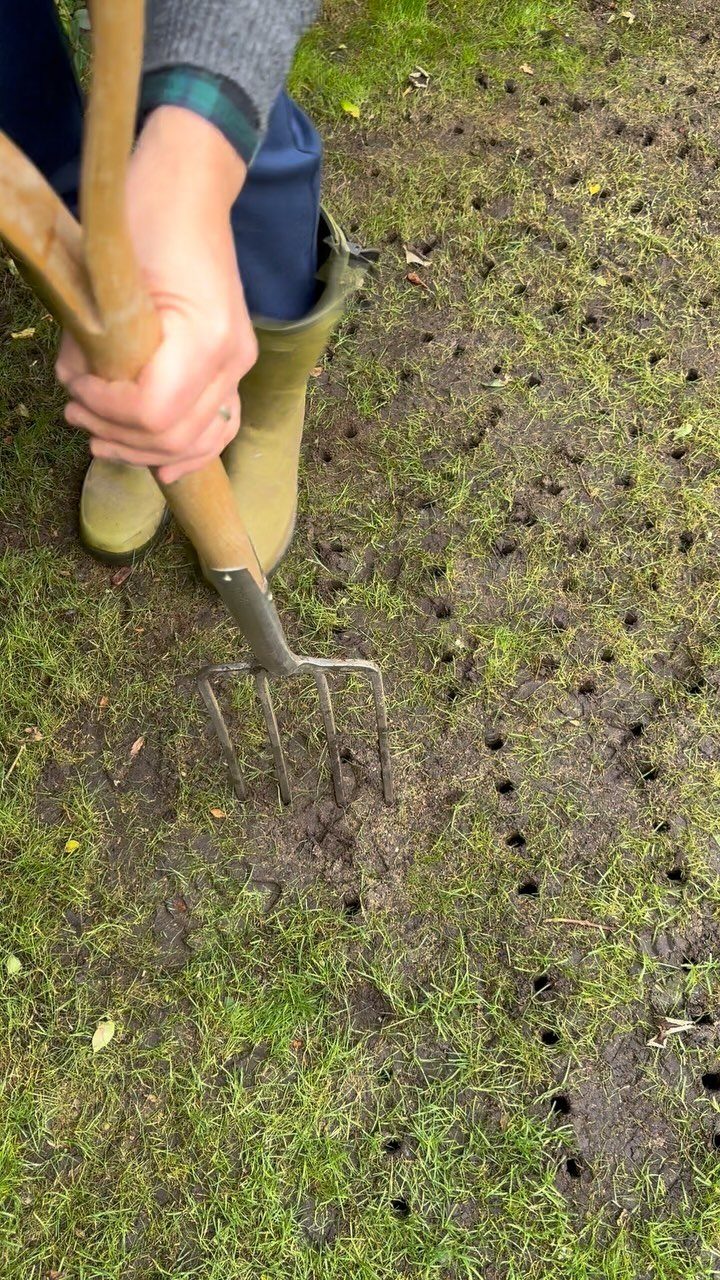
The no-build option: a standard digging fork, stepped into the ground and rocked slightly to open a hole. The visible rows show a methodical spacing, roughly 6 inches apart in a grid pattern.
This is my pick for a first project or a lawn under 1,000 sq ft.
No construction, no storage, no cost beyond tools you likely own. A fork goes where you put it, not where you might forget, and the holes are larger than a machine spike’s, so top-dress with compost after to fill them.
Rock the fork, do not lever. Levering widens the hole and tears roots; the slight back-and-forth loosens the soil plug enough to lift free without ripping what you came to help.
6. Circular Metal Plate Aerator
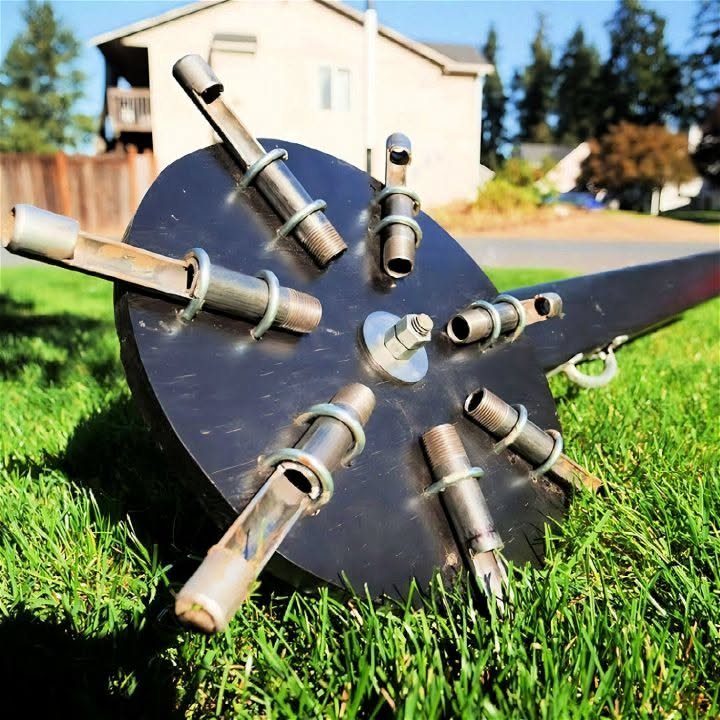
A flat steel disc with hollow pipes radiating like spokes, rolling as it is pulled. The pipe ends punch and remove small soil cores, the starburst pattern covering ground efficiently with each pass.
Hollow tines are the detail here: they pull a plug rather than poking a hole, which relieves compaction better than solid spikes in heavy clay soils like I have in my yard.
The flat plate keeps weight low and centered, so this tows lighter than the concrete tube options.
What I’d check is pipe diameter. Smaller pipes take cores that break down faster; larger ones remove more but need harder pulling.
I’d also want a way to clear clogs, since wet soil packs inside hollow tines and ends your aeration early if you cannot knock it free.
Benefits of Aeration
Aeration opens compacted soil so water, nutrients, and oxygen reach grass roots at the depth they actually grow. Without it, roots stay shallow and turf thins out even when you are fertilizing and watering on schedule.
Hiring a pro to spike-aerate your lawn typically costs between $40 and $250, which is why I like the DIY route for this job.
A strap-on block aerator built from scrap wood and nails costs about $6 to $8. The savings are real, but so is the labor: you are the motor on that one.
Time the job for your grass’s peak growth window so it recovers fast. Cool-season grasses handle early fall; warm-season types respond better in late spring.
The homemade options work because they match the mechanics of what you are trying to do. Punch or pull cores to depth, space passes so the lawn can rebound, and the grass does the rest.
Lots of homeowners are convinced that the key to a lush lawn lies in knowing how and when to aerate their lawn, but affordable spike aerators often do more harm than good, and core aerators can be expensive and hard to come by.
— Hunker
DIY Vs. Store-bought
Store-bought aerators start around $159 for a dual-rotor design like the Amick Doubledisk Rollaerator.
Replacement tines for commercial units add cost but save build time. Liquid aerator products run about $50 per quart, though they work by chemical action rather than physical penetration.
Building your own trades money for time and skill.
Salvage rotors with hubs cost roughly $18; without hubs, around $10. The design is where you gain: flipping a handle to reverse beats wrestling a heavy drum around, and sandwiching tines between 2 rotors adds weight where a single drum falls short.
What you build fits what you own. The question is which resource you have more of, cash or Saturday hours.
Frequently Asked Questions
Is it easy to aerate your own lawn?
Yes, especially with the no-build option.
A garden fork stepped into the soil and rocked slightly opens holes without construction, storage, or cost beyond tools you likely already own. The strap-on wood block method takes more labor but still works with basic hardware.
Should you pick up plugs after aerating?
Leave them.
The soil cores break down and feed the lawn naturally. If you used a hollow-tine design like the circular metal plate aerator, those plugs are especially worth keeping in place since they came from the depth where compaction was worst.
Top-dressing with compost after fork aeration fills the larger holes too, so the grass settles instead of leaving pits.
What are common mistakes to avoid when aerating my lawn?
Aerating when soil is too dry or too wet both cause problems. Dry soil resists penetration and the spikes or tines skid across; wet soil smears and recompacts around the hole.
Rock the fork slightly to loosen the plug, do not lever it out like a pry bar, since levering tears roots wider than the hole itself.
On any rolling build, the weight has to land right: too little and the nails barely scratch the thatch, too much and you press the soil tighter instead of opening it up.
How to aerate a lawn with a plug aerator?
Pull the tool at a steady pace so the hollow tines punch straight and pull cores cleanly. Too fast and the tines slice rather than plug, skip out of the soil, or clog with packed earth.
With a plug aerator, I walk a grid and keep my passes about 6 inches apart so the lawn has room to fill back in.
Knock wet soil free from hollow tines as you go, since a packed tine ends the job early. Afterward, let the cores decompose where they fall or add compost to help fill the holes.